Back to CapitalForecastDirect Main Menu
Importing Locations and Buildings
Locations typically describe the facilities in your organization. (Dude Elementary, Dude Hall, Maintenance Shop, etc.)
For organizations that have multiple campuses or sites, each with multiple facilities on them, you may decide to use Locations to describe the campus. Then you can use the Building field to describe the structures on each campus.
*Note: If you own the Asset Essentials integration feature, you are unable to add Locations or Buildings through CapitalForecastDirect. All new Locations or Buildings must be added through Asset Essentials.
In CapitalForecastDirect, you must choose whether the system will model your needs using your Locations or your Buildings. If you select Locations, you do not need to add Buildings to the account. If you select for the model to use Buildings, you are required to set up at least one Location. This is because Locations and Buildings have a parent/child relationship in Dude Solutions applications. A Building must be assigned to a Location.
Once you have made this selection in CapitalForecastDirect, it cannot be changed. If you decide that you must switch your selection, contact the Dude Solutions Client Service Center for assistance.
How to Import New Locations and Buildings
To import new Locations and Buildings, you will use an Excel template available in your account to fill in the information that is necessary when adding a Location or Building.
Downloading and Using the Template
- Click on the Import Data link under the Information & Analysis section of your home page.
- Hover your mouse over the Shortcuts menu and click on Import.
- Click on the Download Template link next to Locations - Buildings and open the file.
- The Locations and Buildings Import Template spreadsheet will open in Excel. Each row in the spreadsheet will be a new Location that is imported into your account and each column represents information that can be added to the Location you are importing.
- The following fields are required and recommended when importing Locations - Buildings:
- Location Code- this field can be left blank when importing a new Location. If you need to enter a Location Code, be sure it is unique to the Location. If a Location Code is entered that matches an existing Location Code in your account, the record will be updated rather than created.
- Location(required)- enter the name of the Location in this field. If a Location is entered that matches an existing Location in your account, the record will be updated rather than created.
- Location Date Built (required) - Enter the date the Location was built in mm/dd/yyyy format.
- Location Square Footage- enter the Square Footage of the Location. *Note: While this field is not required, we strongly recommend entering this information if you are using CapitalForecastDirect's included model values and Building Types.
- Location Notes- enter any additional notes about the Location.
- Building Code- this field can be left blank when importing a new Building. If you need to enter a Building Code, be sure it is unique to the Building. If a Building Code is entered that matches an existing Building Code in your account, the record will be updated rather than created.
- Building(required if you are importing Buildings and your account is set to model based on Buildings)- enter the name of the Building in this field. If a Building is entered that matches an existing Building in your account, the record will be updated rather than created.
- Building Date Built (required if you are importing Buildings and your account is set to model based on Buildings) - Enter the date the Building was built in mm/dd/yyyy format.
- Building Square Footage- enter the Square Footage of the Building. *Note: While this field is not required, we strongly recommend entering this information if you are using CapitalForecastDirect's included model values and Building Types.
- Building Type (required) - Select the Building Type the best matches the Location or Building you are importing. *Note: If you are using a custom Building Type, it must be created in the account before importing. Be sure to type the your custom Building Type name exactly as it appears in your account.
- CRV- enter the CRV as a number, not a currency. *Note: The CRV will automatically be calculated based on the Location/Building Square Footage and Building Type if no value is entered.
- Save the template file as .xls or .xlsx. Name the file and save it in a location that is easily found on your computer.
Importing the Spreadsheet
- Click on the Import Data link under the Information & Analysis section of your home page.
- Hover your mouse of the Shortcuts menu and click on Import.
- Select Locations - Buildings under Import Type.
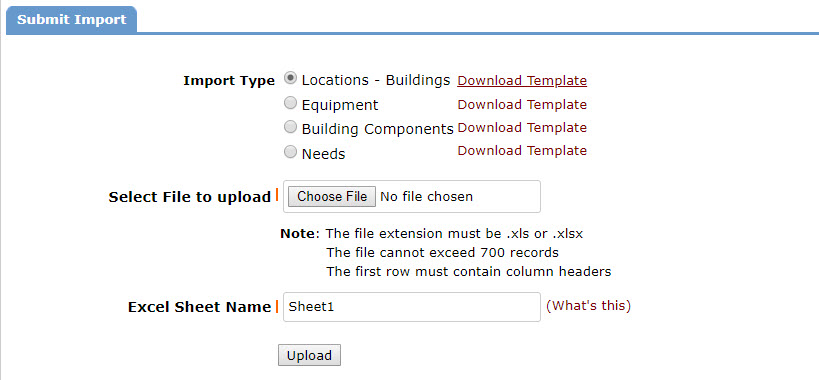
- Search for the file that you saved and select it to upload.
- Make sure Sheet1 is entered in the Excel Sheet Name. This must match the name of the Excel worksheet in the saved file.
- Click Upload.
- On the Submit Import page, make sure the Field name and the Excel Column Names match.
- Click the Validate button at the bottom of the screen.
- When your file has been accepted on the Import Validation screen, click the Import Data button to import your Locations and Buildings.
